

Having founded London-based stationary and design studio BerinMade at the age of 25, Erin Hung has made a career out of sharing her imaginative DIY creations with the world. To help channel the festive atmosphere in the lead-up to Chinese New Year, Erin has shared this DIY guide to make these peach blossom hanging planters to inject some florals into your home.
It’s freezing cold, and feels well and truly like Chinese New Year in the air. Growing up as a kid in Hong Kong, the Lunar New Year felt distinctively traditional compared to the everyday Westernised backdrop of the city. For a few weeks, everything was decked out in red and gold, we ate all kinds of sweet treats and ran around the house with our cousins all day long!
We always had a beautiful peach blossom plant in the house during Chinese New Year. Every year I stared, mesmerised by its dainty and delicate blooms, and wished that it could stay for a while. This year, we crafted our own paper version of the blossoms, and challenged ourselves to make a geometric hanging planter from scratch, giving it all a contemporary look that could last all year around. Best of all, your planter can hold your other paper flower crafts or foliage, so it’s completely customisable in your own way.
Join us below to make one (or a few) for yourselves!
Materials:
- Light pink and green stretchy crepe paper
- Hot glue gun (or PVA glue)
- Scissors
- Green wire
- White gouache or watercolour paint
- Paint brush
- Drinking straws (party pack)
- Gold spray paint
- Petal templates (download, or draw your own)
To make the blossoms
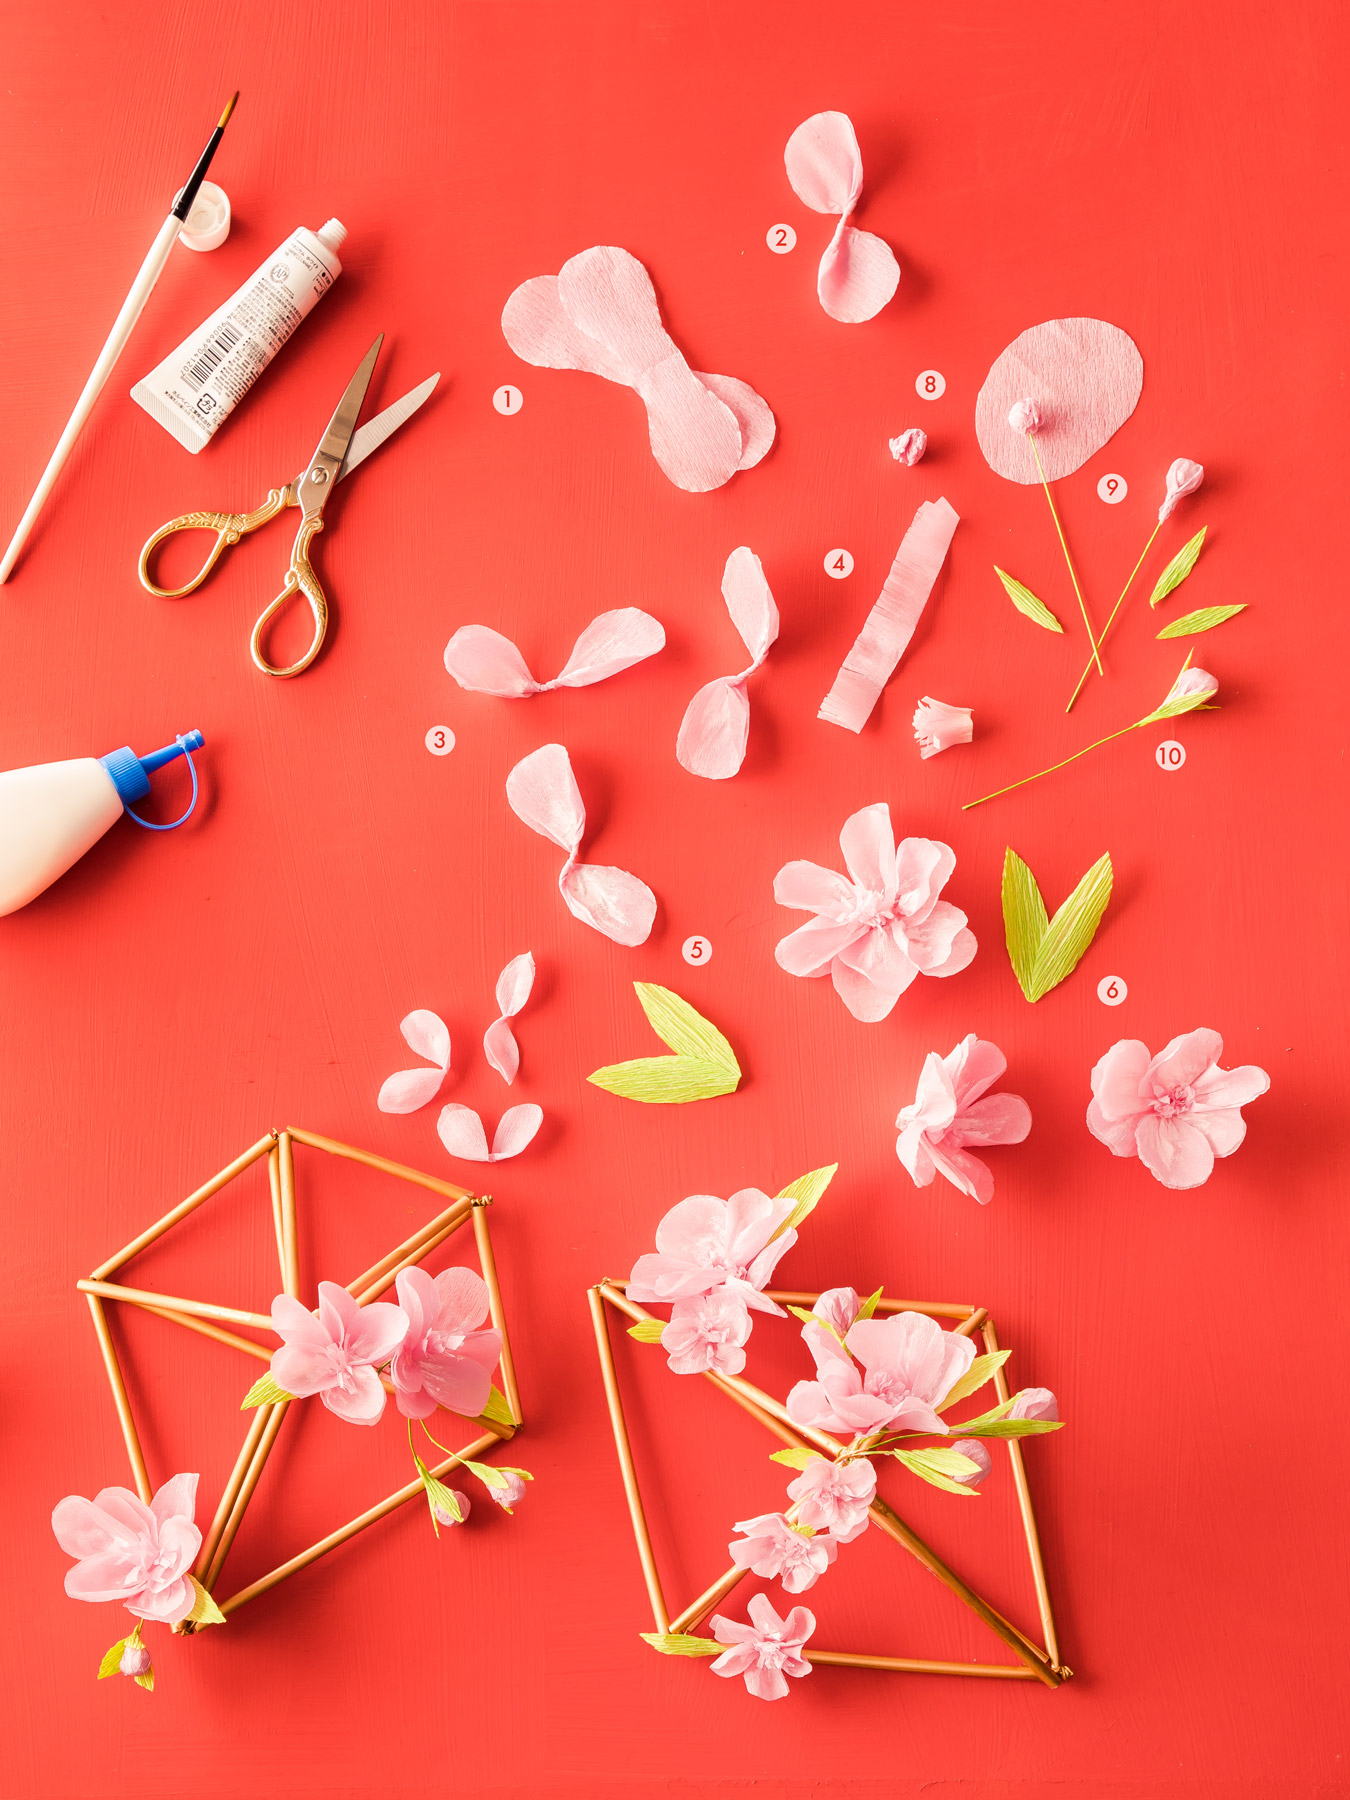
Step 1
Start by cutting out your petals from halved light pink stretchy crepe paper along the grain with a petal template.
Step 2
Unfold your petals into its full shape and twist the middle section to create a cupped shape at the base of each petal. Stretch out the middle of the petals to create more fullness.
Step 3
Paint the middle of the petals white with a small dab of white gouache or watercolour, and repeat this process to create 3 sets of petals (6 petals in total). Overlap the twisted middles of each petal to form a full blossom.
Step 4
Fold a rectangular piece of light pink stretchy crepe paper and fringe the edge with scissors. This goes into the middle of the Blossom.
Step 5
With light green stretchy crepe paper, cut out the leaves.
Step 6
Glue together the petal pairs, stacked and arranged into the shape of a flower, with either a hot glue gun or PVA glue at their twisted centres. To finish off, roll the the fringed strip tightly length-wise, and glue to the middle of the flower. Glue on the leaves to the base of the flower.
Step 7
Create blossoms of different sizes, which you can arrange on the geometric planter to vary.
To make the buds
Step 8
Cut a small square of pink crepe, about 5cm squared. Scrunch it up into a ball.
Step 9
Cut a small piece of floral wire about 7-10cm long, glue one end into the centre of the scrunched up ball with a small amount of hot glue. Let dry.
Cut another small piece of circular pink crepe large enough to wrap around the entirety of the bud shape. Dab a small amount of hot glue onto the base of the bud where it meets the wire, and blow on it slightly so that it cools and is slightly tacky (and not piping hot). Working quickly, wrap the circular crepe around the bud and using your index and thumb, twist the edge of the circular crepe around the base of the bud around the wire.
Step 10
Cut 3 small pieces of green crepe leaves and attach to the base of the bud, covering the area where the bud joins the wire.
To make the hanging geometric planters
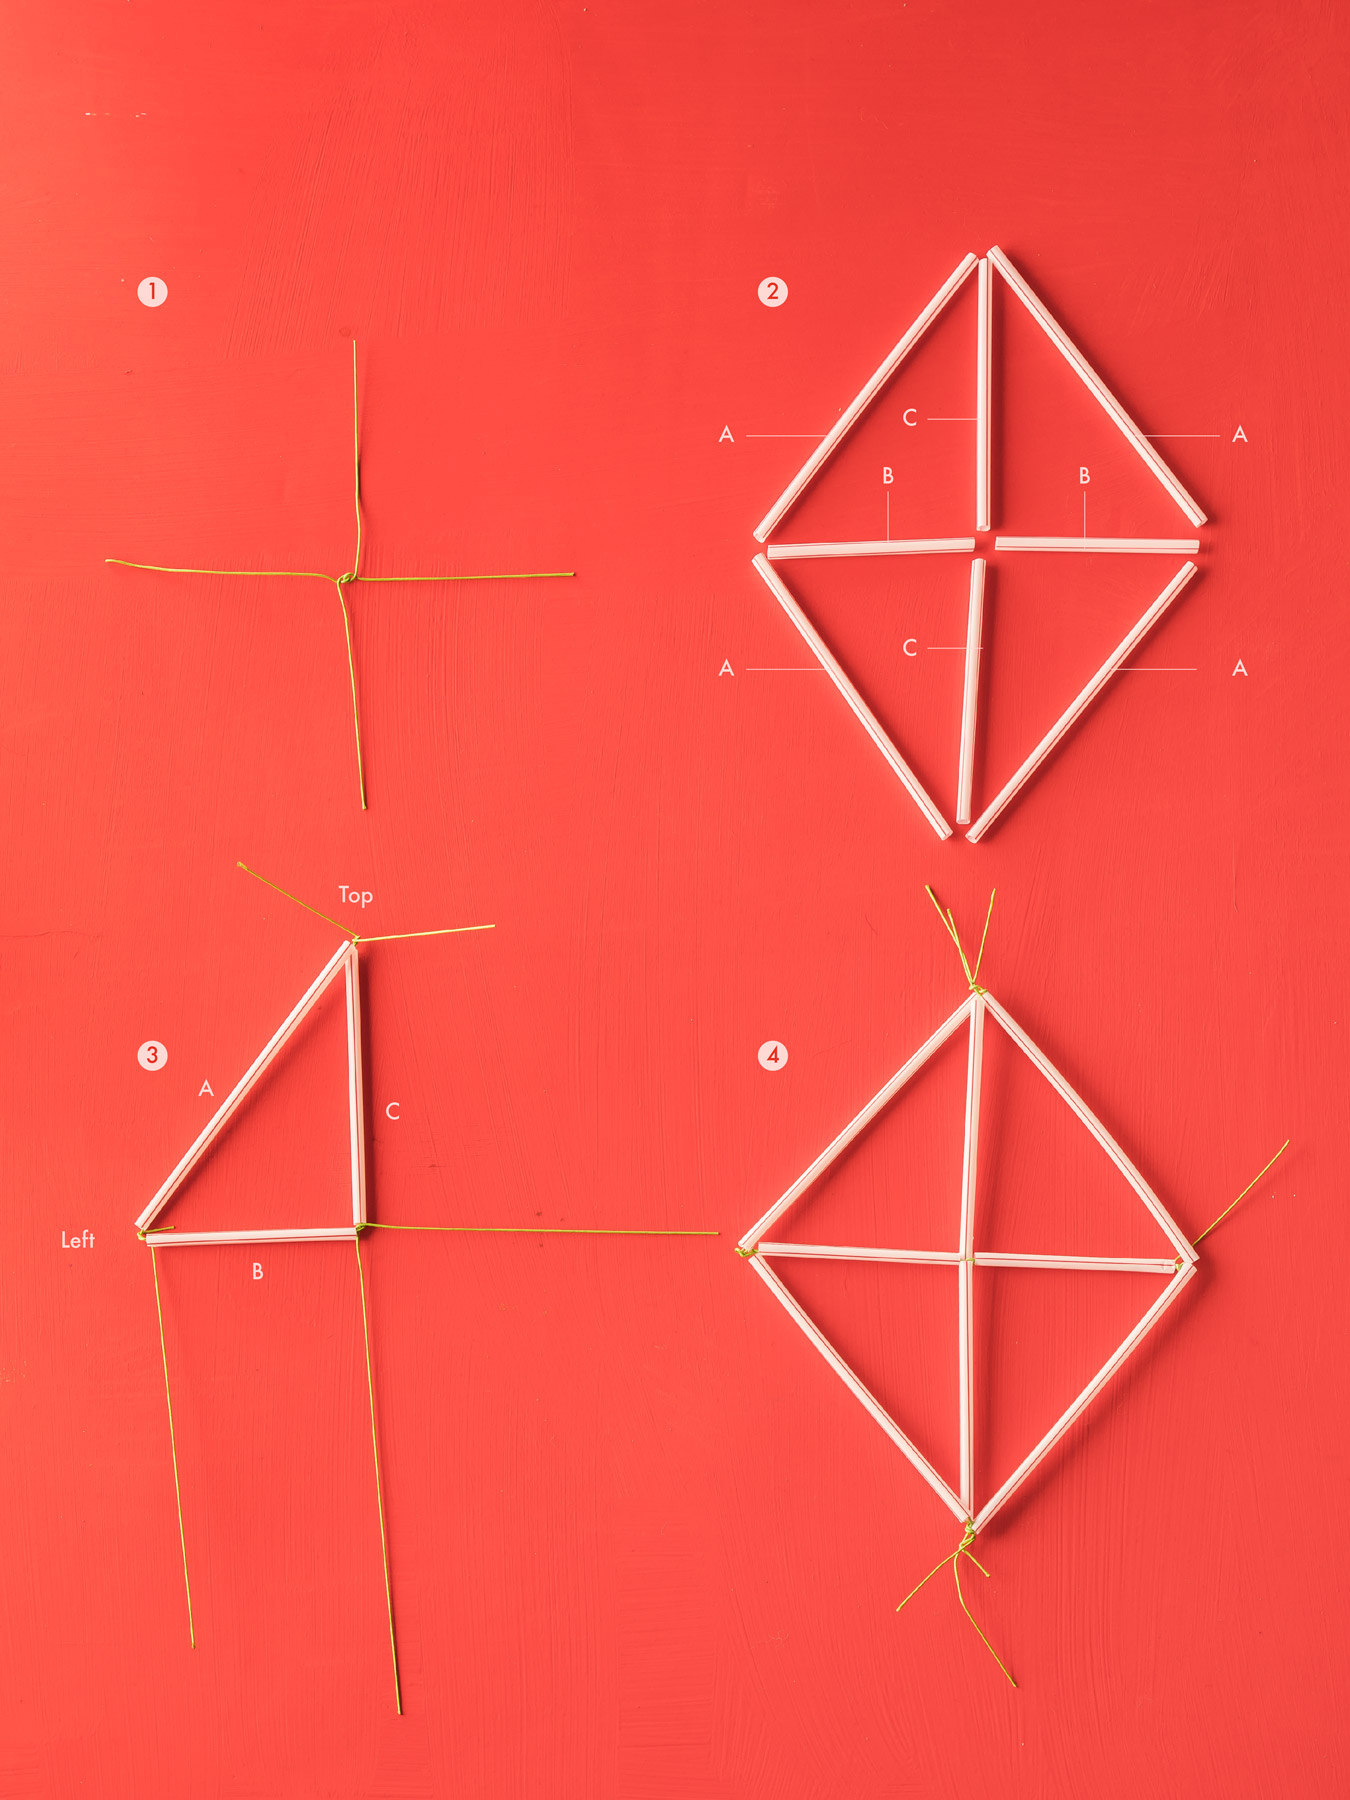
Step 1
Take two pieces of floral wire 30cm long each, twist them onto each other to make a cross shape.
Step 2
Cut the below lengths of straws to make the base shape:
A x4
B x2
C x2
Lay them out into the base shape (annotated) to help visualise how it will look.
Step 3
Taking the cross from Step 1, slide in straws C & B. Take another length of wire and twist at the top end. Insert straw A, then twist together two ends on the left.
Step 4
Continue to go around the remaining 3 quarters of the base by adding any of the Straw As with a wire, and then adding the corresponding vertical or horizontal straw, securing together by twisting ends of the wires together where they meet. Make sure all the straws are twisted into place securely, and leave the excess straws in place.
Step 5
Cut the below lengths of straws to make the pyramid top shape:
D x 2
E x 2
Repeat Step 1 to make a wire cross, the slot in the straws as annotated.
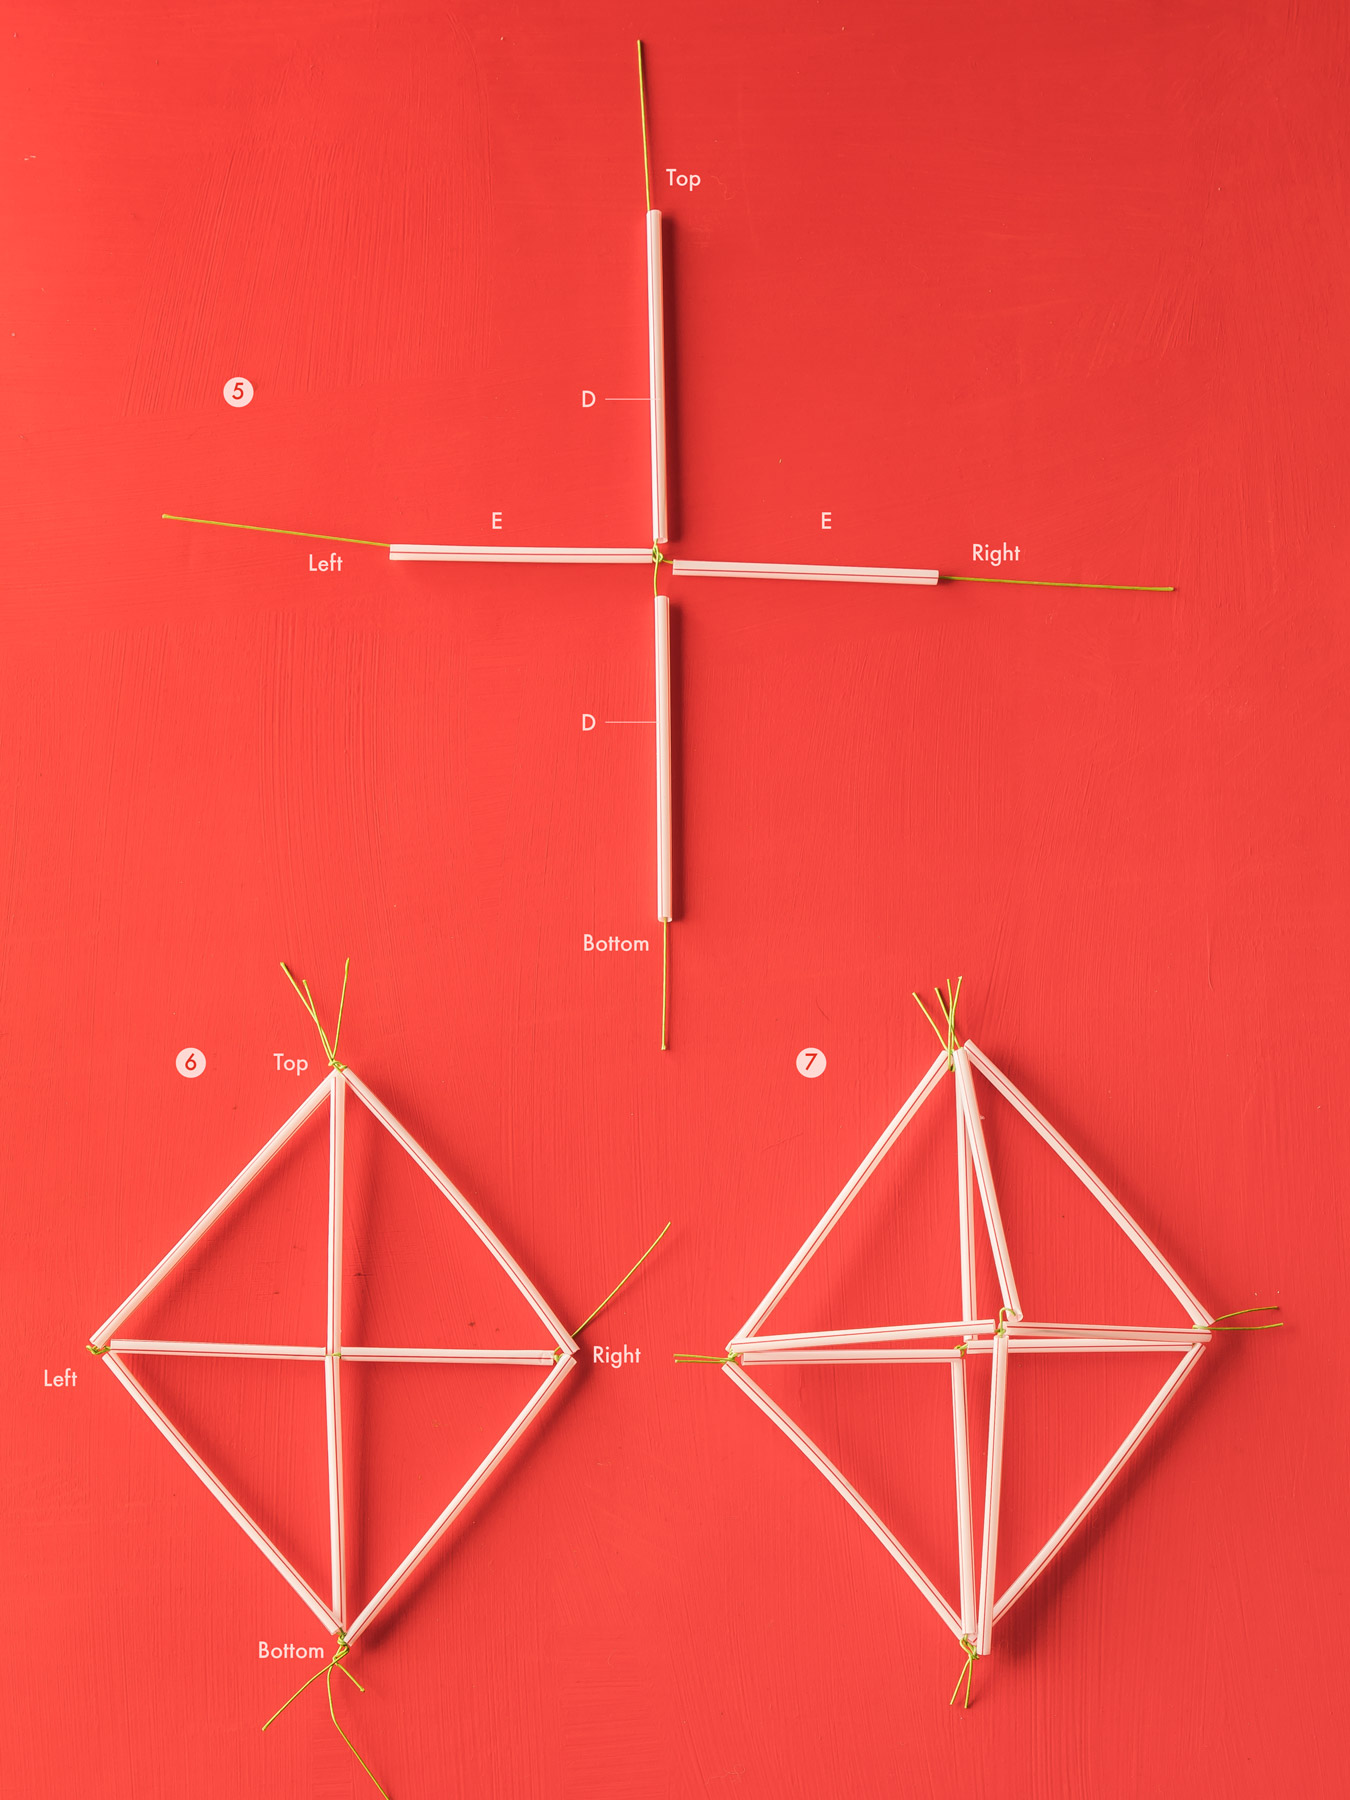
Step 6
Take the base and attach each corresponding points (top, right, bottom, left) to the pyramid portion.
Step 7
When all the straws are in place and attached securely, snip off excess wires with scissors.
Spray with gold or silver paint. Use two coats if necessary, waiting half an hour between each coat. As the metallic paint may flake off, seal with a light coat of PVA glue when it’s completely dry.
To assemble
Simply arrange and attach the flowers, buds and leaves onto the frame with hot glue. Always apply hot glue onto the base of the flowers, blowing on it slightly so that it cools off and becomes tacky, before affixing to the structure. Never apply hot glue directly to the structure as the direct heat will melt the plastic straws.
The post A peach blossom hanging planter tutorial by Berinmade’s Erin Hung appeared first on Home Journal.